Showing posts with label Commission. Show all posts

Wednesday, December 16, 2015

Sunshine Coast Australia Day Awards Trophy

I am delighted to announce that earlier in the year, I was commissioned by the Sunshine Coast Regional Council to design and make the 2016 Sunshine Coast Australia Day Awards Trophy.
Mateship, kinship and uniting as one, were the inspiration behind my design. The idea behind the concept was to design a trophy that represented what it means to be Australian and living on the Sunshine Coast.
It was an honour to be chosen to design the Sunshine Coast Australia Day Awards trophy - I believe the nominees for this award are people worthy of celebrating and honouring for the unconditional service they provide, not only for the people around them but also the broader community.
Designed to hang on a wall rather than sit as an object on a shelf, each trophy is cut from recycled corrugated iron using a waterjet cutting technique, and finished with a stainless steel and Jacaranda backing – while an original photograph was painstakingly converted into a vector file to create the design – the finished trophy however a different design is the same concept as
Resilient I pictured below.
Example concept - NOT ACTUAL WORK
Winners in the seven categories will receive their award at the Sunshine Coast Australia Day Awards Ceremony, on Monday 25 January 2016.  


Sunday, January 18, 2015

post firing - success!

Fortunately, luck was on my side this week and I was able to push the Roman Artefact firing through quicker than expected, in between facilitating two separate children's workshops at Caloundra Regional Gallery, which was a load of fun I might add!

This morning I was eager to do the unloading, keen to see the final results. And yay, all looks great!


A few snapshots from yesterday's workshops...making clay dragons is always a hit with the kids!

(photo credit, Julie Hauritz)

And assembling Sacred Temples and Tree Houses from a plethora of materials; paper, cardboard, canvas, string, skewers, pipe cleaners etc... little Ziggy, with her tree house.


Wednesday, January 14, 2015

2015, and back to work!

Seriously, is it 2015 already? Hope you all had a wonderful Christmas and holiday season, mine was a quiet one enjoying quality time around the home and catching up with close friends and family.

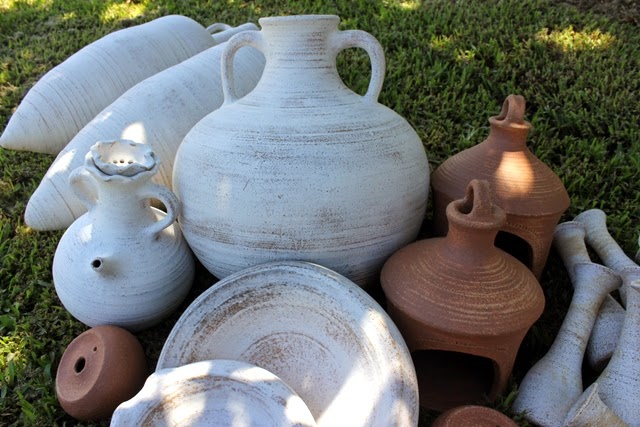
But now its back work and picking up from where I left off from last year - this week finds me in the ceramic studio finishing the Roman Artifact commission.  Loading the kiln and firing the bisque earlier in the week and today glazing and re-loading, a bit of a workout glazing the large amphorae!


Above picture, the kiln stack all loaded and ready to go.


Using a little artistic licence and creative stacking, the two large amphorae are stabilized using the up turned medicine bottles. And, a little wadding pad in between (detail below), for releasing easily after the firing.


Will post the outcome in a week or so...


Saturday, October 18, 2014

Commission keeping me busy

When I go all quiet, it generally means I am working on something....

Within a couple of months of retiring from the annual Abbey Medieval Festival (to consolidate my art practice), a commission comes in for ancient Roman artefacts. Ironic!  I know it's not the same time period, but I still find it funny, how when you finally decide to move on....

However, not one to let an opportunity pass me by and with no major commitments at hand and my exhibition just about to finish, what the heck!  Several large and small amphorae (tallest 700mm) and a couple of oil lamp holders.


A little creative thinking for drying the pointed amphorae base, submerged into buckets and supported by coarse sand - challenging, to say the least!


So the drying process begins - given the size of each, especially the larger amphorae, drying them slowly and over a month or so, is the go...

Wednesday, November 21, 2012

No.11 sculpture - In situ

Installation day for the commission, it was really nice to see the piece in place and how I envisioned it....


Wednesday, November 7, 2012

commission progress - clay component

Shaping up nicely!  The clay component is labour intensive - there are so steps involved in the process, the making, the drying time, sanding each piece, bisque firing, several steps to glazing, the glaze firing etc... and then making sure you get the shrinkage rate right!!!  Thankfully after the final firing, the reward comes when opening the kiln door and seeing all is well.

In between blog posts and living with the steel structure for a bit, I've decided on some minor adjustments to the clay design - instead of making each alternate block smaller I've decided to make them all uniform and with less texture on the surface giving each block a flatter finish which sits better in the steel frame.  And slightly reducing the firing (reducing oxygen in the kiln whilst firing) to yield a richer patina in the glaze, aesthetically pleasing with the rusting steel.

A sneak peak - the clay behind the negative space looks good.


Clay process took two months in the making - various depths of clay blocks were made (estimated according to the clay's shrinkage rate). Here the kiln is all loaded and ready for bisque firing.


After the bisque, the clay blocks ready for glazing.


Glazed blocks drying and ready for loading into the kiln for the glaze firing. I've made more blocks than needed - experience has taught always have extra on hand just in case!


The anticipation of cracking open the kiln the next day..........!!!!


Assembling - a day or two of fine tuning. Detail blocks stacked within the steel frame and the clay's surface.


Wednesday, October 10, 2012

commission progress

Things are coming along nicely with the commission - the steel structure is ready and awaiting the clay component.  A few photographs to show how it's looking...

The two spirals are welded at points where the steel meets at the top and then reinforced with a steel plate welded to the base (lid) inbetween the spirals for strength.  This serves as the lid and bolts on either side to lock it all together - the clay blocks* are built up in the centre to the top and will highlight the house number No.11.

* (the clay blocks will be the dry Cream Glaze as the totem sculpture with the three shell spirals in my previous post)


A few minor changes to my design - angle steel replaces the reo for added strength and to protect the clay edges. Four brackets instead of two, to secure at the base.  The bolts on the lid had to be reconsidered and put to the side so the internal plates for securing were not in the way of the clay being placed within.  Overall the sculpture is shaping up like my design (which of course was not to scale, I might add).


Behind view...


Next post will be on the clay component - so I best get into the studio and get on with it!

Tuesday, October 2, 2012

back into sculpting!

I've been working with a plethora of material this year, however, as much as its been fun, I feel it's time to settle back into my chosen materials of steel, clay and found objects for a bit!

To get back into the saddle, I've silently been working away on a commission. Taking on commissions are a great way to push the boundaries and of course they help pay the bills!

My scratchings on paper helped when discussing my ideas with my clients. A few minor changes were made but by and large, we were all happy with the concept design.


Below, some works that inspired my clients - the stacked block concept, spirals and rough textured clay.  These earlier works grace our gardens and are also incorporated into our landscape designs for Enviro Scapes (landscape garden business).


You'll notice the steel component incorporated into my design above - which is really where my focus now lies in the combination of steel, clay and found materials, much like my recent totemic forms below...however this particular commission is a little more conservative.


I'll marry these ideas together to form the basis of the sculpture (the design above) with an addition of most recent discovery and technique Waterjet cutting. Below; spirals and 'No.11' cut in mild steel by Steve at Caloundra Waterjet Cutting, 


Experimenting with placement...


Monday, January 10, 2011

Delivery day...

Works - photographed, packaged and ready to deliver to Abbey Museum tomorrow. Just in the nick of time really, as of Monday 17 Jan through to Saturday 22nd the Abbey Musuem is hosting an Egyptian Family Fun Week - full of fun activities; building Pyramids, digging for Artifacts, Mummifications, Heiroglyphics the list goes on...
Ofcourse, these pieces are for the 'digging for artifacts'
Here (above L>R) a group of wares; Jar with a lid, four Beakers with Heiroglyphics. The larger two Beakers contain Cartouche (royal names) of Ramses II.
Cartouche 1 - (royal names) of Ramses II - 1279 to 1213 BC

Four plates; (two above & two below) designs taken from the Egyptian period.
The plate above right is known as the 'Fish Bowl' - New Kingdom, Dynasty 18, about 1450 B.C (ofcourse this one is a reproduction for the dig!), the original piece is housed in the Egyptian Museum, Berlin.

Saturday, December 4, 2010

what's on the go in the studio

This wet weather has created a stallmate for me in the studio, its most uninspiring to work in the shed when its cool, wet and windy! However it does give me a dam fine excuse to be inside out of the rain and catch up on the other things. I might just get the Christmas decorations out!
Here's a look at what's in the studio waiting for a bisque...

A collection of carved Pitchers; Unearthed series,

Commission Abbey Musuem Egyptian Dig pottery; beakers, plates and pots handcarved decoration, hieroglyphics on the beakers.

Above & below; souvenir magnets for the Sunshine Castle

Sunday, February 28, 2010

Happy snaps...

Happy snaps from my delivery to the Abbey Museum of the Canopic Jars....
They were very pleased with the results and shared the news with their followers on twitter!

Thursday, February 4, 2010

Canopic Jars

Just out of the kiln last night and ready to deliver...
Four Canopic Jars for the Abbey Museum's Egyptian Tomb 'Dig'

From left to right - Four Canopic Jars; Falcon, Human, Anubis, and Baboon. Height tallest 30cm

Canopic Jars were used to store and preserve human organs for safekeeping in the afterlife. During the mumification process organs were removed and stored into the jars and were buried in the tomb together with the sarcophagus of the dead.

Each Jar held a particular organ; the intestines were stored within the falcon, the liver in the human headed jar, the stomach was stored in Anubis, and the lungs were contained within the baboon.