Showing posts with label porcelain. Show all posts

Wednesday, August 13, 2014

Open Studio this weekend!

I am delighted to be participating once again in the 2014 Australian Ceramics Open Studios (ACOS).  The national event kicks off this weekend on Saturday 16 & Sunday 17 August, 2014, between the hours of 10am and 4pm.

Please accept this warm invitation and join me over the weekend and indulge in clay, creative conversation or perhaps view my Expressions of Love II ceramic + tea bag works, recently exhibited at Noosa Regional Gallery.

To arrange an appointment email info@kimschoenberger.com

With over 130 artists studios opening their doors to the public, mine included, The Australian Ceramics Open Studios (ACOS) promises to be a celebration of clay, creativity and community.

A regular day in my studio with my best mate, Max...


If you would like to know more about the ACOS event, please click on the inserted links above. The
2014 ACOS event is hosted by The Australian Ceramics Association (TACA). 

Monday, February 11, 2013

Two Group Exhibitions - Two Galleries

It can be so exhilarating and inspiring exhibiting amongst other creatives, I never cease to be amazed by the talent of other artists, for me its so inspirational I end up going into creative overload and over drive and being a live-wire for days...!  Its almost like I should go and get therapy for it.  

Two fab galleries; Studio 4 Gallery, Marcoola and Rosebed St Gallery, Eudlo (which I might add.... are two local professional galleries that nurture, support and provide us with a venue to showcase our art works and reach a wider audience) are both currently showcasing a group exhibition, that feature my ceramic assemblages, so if your in the area...

 
 'Childhood Companions' Max & Maxine - (more images on my website Small Is The New Big) at Studio 4 Gallery and exhibiting until 24th Feb, 2013.
 
 
 ...and my metal and porcelain Flourish III (more images on my website: Roses Of Rosebed) at Rosebed St Gallery and exhibiting until 3rd March, 2013.

Exhibition specs:
Studio 4 Gallery, Marcoola
Small Is The New Big
Until 24th February, 2013

Rosebed St Gallery, Eudlo
Roses of Rosebed
Until 3rd March, 2013

Monday, September 17, 2012

International Cone Box Show

I am delighted to announce an entry of my pierced porcelain has been shortlisted and selected into the 2012 International Cone Box Show.  A biennial event the Cone Box Show showcases miniature ceramic pieces within the dimensions of 3" x 3" x 6" to fit inside one standard size Orton Cone Box.  If your wondering 'what' Orton cones are?  Orton Pyrometric Cones are used to visually guage that the firing process is under control within the kiln. Cones measure heat work, the effect of time and temperature an aid giving an acurate guide that the kiln has reached its temperature.


Unfortuantely I didn't take a photgraph of my actual entry (naughty me!) however it is pictured on a shelf (a wall mounted top shelf and to the left) in the preview album on their webiste, it is similar in size to the image below on the right however not the same as, of course! These pieces are in the collection of  FaB; Fiona Dempster and Barry Smith.

Feeling very honoured with only two enteries selected from Australia - myself and Greg Daly.  Other countries include; USA, Canada, Denmark, Italy, Japan, Scotland, England and Singapore.

 
Exhibition details for the US locals:

September 14-October 31, 2012 - Show available for viewing and pieces available for purchase at the Lawrence Arts Center.

September 28, 2012 - Official Cone Box Show reception at the Lawrence Arts Center

March 19, 2013 - Exhibit on display in Houston, TX in conjunction with the NCECA (National Council on Education for the Ceramic Arts) Conference.


ps...also I would like to send a special thank you to Carol Forster, friend and mentor for her continued support and guidance and informing me of the competition details, many thanks Carol!

Sunday, June 3, 2012

Official opening - Domestic Duties

A BIG thank you to everyone that came out last night and braved the wet weather to help me celebrate my opening. It was an awesome evening!  A few snap shots...


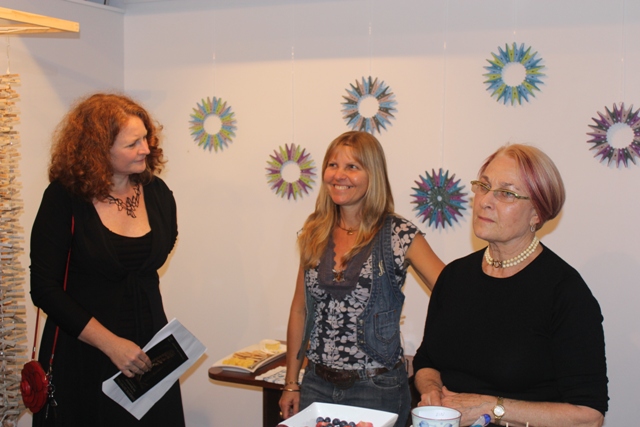
From left; Julie Hauritz (Education & Public Programs Officer Noosa Regional Gallery), Me & Jennifer Stiller (Studio 4 Gallery Director).  A collection of my peg mandala's in the background.


A few familar faces and not so familar.


My good buddy Jen and mum Dorothy - taking in the interactive piece Circle of Friendship with Bad Hair Day I, II & III in the background.


Phil Willy and of course me.  Part of NEVER vintage ironing board laser cut mounted on plexiglass in the background.


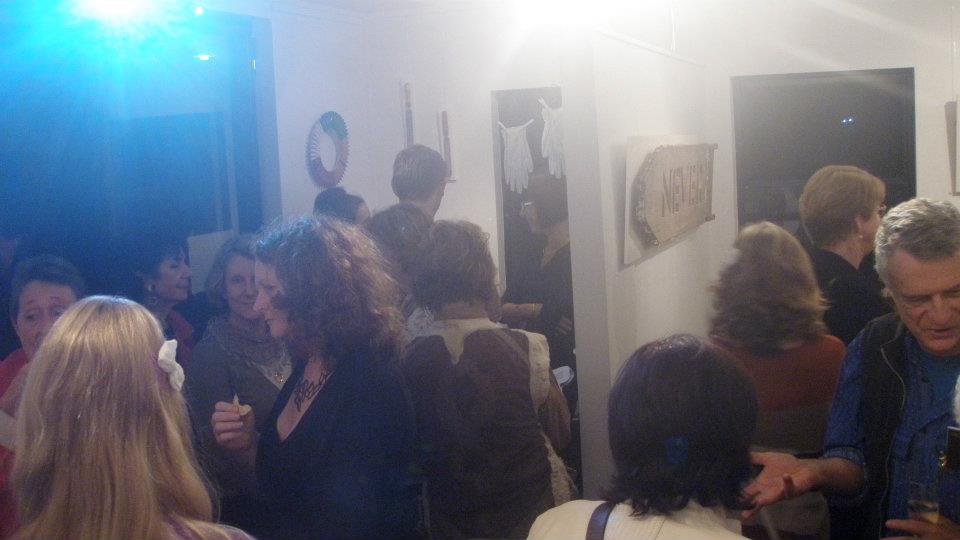
Many heads filled the gallery - fine wine and good company...


Of course those fabulous ONE words on a wall.


Me again and the extremely talented portrait artist Jandamarra Cadd


Presenting Julie with a gift for her inspiring speech (many thanks Julie!)


A small selection of works are now on-line for viewing >  Studio 4 Gallery

Friday, May 18, 2012

Domino tiles, vessels &

The next group show I am participating in is an exhibition of Friendship & Collaboration.  Sponsored by Sister City Friendships and the local Government fellow artists Noela Mills and Christine Elcoate travelled to Jingdeshen, Xiamen and Wushi last year connecting with many artists, on their return they conducted 4 workshops here on the Sunny Coast with Chinese artist Li Jun resulting in a collaborative exhibition Culture 2 Culture with 12 artists [Li Jun and 11 locals], and school children's works from 2 Chinese schools and 3 Sunshine Coast schools.

The centrepoint of the exhibition will be 300+ domino sized ceramic tiles - made in Australia, some glazed here by local artists, others glazed in China and brought back for the exhibition.
and now we have a collaborative exhibition at  Rosebed St Gallery, Eudlo. 

A sneak peak of my pieces to be showcased - my inspiration was drawn from traditional Chinese porcelain techniques...


 My three slab rolled Southern Ice (SI) porcelain domino tiles


Wheel thrown pierced SI porcelain - Spoked


Handcarved SI porcelain tile - He Loves Me, He Loves Me Not


A detail of the Triptych - Floral Motif  etched SI porcelain


and a 3 dimensional piece also SI porcelain - He Loves Me, He Loves Me Not

Monday, April 2, 2012

200th Post - giveaway

An all porcelain selection!!
Southern Ice porcelain is an expensive and delicious clay. I fire to stoneware giving a pure white finish, an intentional unglazed outer surface allows me to polish to a smooth soft sheen, with the finish feeling very similar to newborns skin.
Given the nature and the quality of the piece I intend to giveaway I would like to invite you to contribute to my next solo exhibition, most will be familiar with my Domestic Duties Exhibition coming up and many of you have given me your ONE word to the collective (if your not familiar click the link above). The exhibition is just two months away and I would love some more ONE words, so far I have nearly 700 words and it'd be fab if it totalled 1000!
To refresh your memory - "Describe in ONE word your feelings toward domestic duties - negative or positive" - So would it seem fair of me to ask you for Ten (10) - ONE words?
All you need do is comment your Ten (10) - ONE words and which piece you'd like to receive:
1. Looking Glass, 2. Repetitive, OR 3. Punctured

1. Looking Glass
H 7.5cm x Dia 4cm
Polished Southern Ice porcelain, clear gloss interior and plexiglass.
 
2. Repetitive*
H 8.5cm x Dia 6.5cm
Etched polished Southern Ice porcelain
*(prototype - for Domestic Duties Exhibition, normally I keep these pieces!)
 
3. Punctured*
H 10.5cm x W 11cm x D 4.7cm
Polished Southern Ice porcelain & horseshoe nail
*(front view top, side view below)
 
I will draw the winner next Sunday evening (around 6pm'ish) 8th April - Oh, I see this will be Easter Sunday a special Easter treat!!
 

Wednesday, March 14, 2012

Porcelain is on its way to W.A.

I know I've been quiet the last month or so in the land of blog, I do have very good reasons I promise! I won't bore you with all the long winded details, however I will share you with some of the exciting news that has developed.
A small collection of my current Southern Ice Porcelain works; Etched and Punctured Series are making their way as (I type) to Streater Gallery in Western Australia. John Streater Fine Furniture - Yallingup Western Australia is a stunning gallery situated in Yallingup near the Margret River.

I am so grateful for how things are moving along for me at the moment, I feel I am needing to extend this good will forth! This is my 198th post - so get ready folks, a 200th giveaway is just around the corner!!!

Sunday, November 27, 2011

Journal of Australian Ceramics - featured article

Words cannot convey the joy I am feeling this month, or even for this whole year matter of fact!

Earlier this year I contacted Stephanie Outridge-Field to see if she would write about my studio practice. Stephanie's career in ceramics spans over thirty years, her work is just devine and not only is Stephanie a lovely person, she is a mentor and an inspiration! I feel very honoured and previliged to be featured in the latest edition The Journal of Australian Ceramics (50/3 Nov, 2011, which can be purchased on-line by the way...) and to have had an article written by Stephanie.


"Flourish"

The stunning photography by Tony Webdale, Flourish is captured on page 81 and filling a whole page.

Tuesday, May 24, 2011

porcelain with mixed media

It's been some time since I have posted any news about my ceramics on my blog and my reason being I have decided to use facebook as my primary platform for it (if you are wanting to see what's going on in the studio, all you need do is, scroll down, click on the fb link on this home page).


These days my ceramics practice is divided between my new found love of welding assemblages, and as it seems the 'clay & found objects' are starting to somewhat meld toward each other, as seen in the first couple of images... I'm straying alittle from my familiar coarse clay body to explore the pure white fine delicate body of southern ice porcelain - it's such a beautiful clay to work with and when fired to stoneware, feels like the skin of a new born - it's the ala carte of all porcelain (in my books anyhows!). I'm really enjoying breaking away from the norm, to have a play, and see what will evolve...


"Punctured I"


southern ice porcelain, clear gloss glaze inside, three rusted horse shoe nails


Detail - inside view


I can see some of my love of symbolism, coming through in the fall of the nails in this piece


"Flourish 1 & 2"


Detail - inside view


The next two assemblages - Clown & Maxine are reminiscesnt of fond childhood memoirs...


"White Clown"


southern ice porcelain, sterling silver diamante bracelets, anklets & parts, colapsible


Close-up view of diamante bracelet - a bit of bling!


"Maxine"


southern ice porcelain, colapsible, sterling silver diamante collar and accessories.

Saturday, January 1, 2011

ALaW 2010 - Alphabet two

I had two spare tiles left over, spares for 'just incase'. When working with clay it pays to make more than is needed, incase you make a mistake, drop or break one unintentionally. I must say it is not an easy task to reproduce another identical tile, the same thickness several months later.
A bit of fun, not sure if I'll use them or not.... could be useful for the final layout.

One more photo to share with you. I particularly like the result of staining the clay made on the plyboard I had them stored on, six months of aging...


ALaW - XYZ

XYZ Techniques....

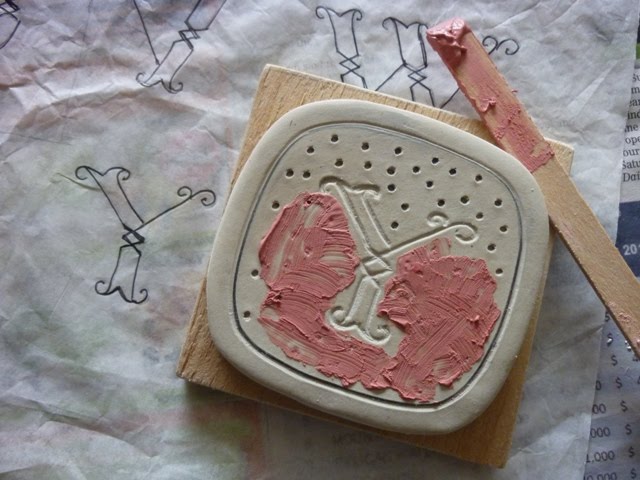
X - Inlay - with red porcelain slip
Y - Freehand marking - with red porcelain slip inlay
Z - Carving
The image is a tad small to see the detail, you can enlarge it by clicking on the image.

AlaW techniques for XYZ

It was like fast and furious to get all these letters finished today and posted! Seeing the third alphabet for ALaW 2011 starts this Monday. So, simple and sweet to wrap things up.
I chose to use my most favourite piece in this alphabet to finish the last two letters using that technique with clay inlay. It happens to be 'P' -dots created by the pointy end of a stick, well, a pencil really.
X - Inlay with red porcelain slip
Transfered the letter lightly onto the clay tile using the transfer paper, then X marks the spot, dots with the pencil. Filled with red porcelain slip, left to dry a little....

...and once touch dry - fast tracking here (it is usually left to dry then sanded) I've used a turning tool to scrap back the slip to reveal the red porcelain slip clay inlay. I will sand when dry to sharpen up the final result.

Y - Freehand marking with red porcelain slip inlay
All my letters to date have been previously marked onto the clay via transfering paper, this time I've loosened up and drawn the letter Y and border freehand with a pencil deeply imprinting the clay tile. The dots are undertaken the same method as with X; clay slip inlay.

All cleaned up looking like a pink polka dot dress! Although once fired the slip will turn red.

Last but not least Z.... I decided to end my alphabet using the same technique that I started the alphabet with, (with the letter 'A') by method of Carving.

Z - Carving

YAY! All done, now all I have to do is -bisque fire them - glaze them - and fire them to 1300*
Stay posted to see the final result....

ALaW - UVW

UVW Techniques...

U - Woodcut Print - with black underglaze
V - Negative Print - with red porcelain slip
W - Negative carving - with black underglaze (Reverse to V)

ALaW techniques for UVW

My last letters for ALaW 2010, somewhat overdue! 5 weeks to be exact, but who's counting...
U - Woodcut Print with underglaze
I've been at this one to conquer for sometime now, with each attempt amounting to dissapointment. And you could say that it was U that held up progress (plus xmas, new year etc...) to completing my ALaW in time. Not wanting it to get the better of me, I left it until I had optimine time to devote 100% head space to retry.
My adjustments I needed to re-address were (and many);
  • The initial carving needed to be deeper, so off to buy real (sharp) woodcut tools!
  • Always remember to carve your letter backwards, just as well the first attempt was a fizzer (and on a test tile).
  • Re-adjust the thinking to clay and not paper as in the workshop, of course Kim...this should have been your first thought, huh.
  • Using black underglaze (not ink) resulted in different tackiness, well no tackiness at all actually. Hence the printing ink roller was not suitable, out with the sponge roller, a test run, and wolla, yay, as easy as that!

The techniques for the next two letters are taken from this idea of the woodcut print process, minus or adding some steps to suit the clay.

V - Negative Print with red porcelain slip

Instead of carving into wood I've carved deeply and directly into the clay with a carving tool. Then with a sponge roller loaded with red porcleain slip, I've rolled over the clay tile to print a negative letter V. Being careful not to get any slip into the carved letter, as in the ink printing method.

W - Negative carving with black underglaze

Reverse to V - Instead of carving the letter first I carved it last. Using the sponge roller again, this time loaded with black underglaze I've rolled over the whole tile completely covering it with black. When touch dry I've transfered the letter W into the clay tile (gently) to make an imprint, then carved the letter and border.

Saturday, December 4, 2010

ALaW - T

The A Letter a Week (ALaW) challenge continues and is fast coming to an end of the second alphabet. Being totally focused on preparations for my next exhibition and extremely wet weather, I am now seriously lagging behind, we're already into December and I haven't finished the November letters! eeek, starting to feel a little under pressure!
T - Carving
Seeing all the common techniques I am familiar with have been used, I'm starting to use the same techniques in previous letters in a different manner, thinking outside the norm if practically possible.
Here I'm carving the clay out around the letter to create a three dimensional 'T', much more challenging than the A and N, where A I carved directly around the outline and N carved within the outline resulting a negative letter.

Sanded and ready for bisque.

Wednesday, November 10, 2010

ALaW - R S

R - Sgrafitto - with brushed on red slip

R is transfered onto the leatherhard clay tile in usual manner. Sgrafitto is generally a technique of scraping back into clay covered with slip, as seen with 'J' . I'm challenging logic with this one, letting go of rules and exploring, which some potters may ask "why?" I guess at this stage of the alphabet it's all about experiementing and I say why not! So instead of applying the slip I've just scraped into the clay body direct then brushed the red slip inside the R imprint and painted the border.

S - Imprint - with organic matter

A bit of fun, not sure what the end result will look like, fortunately I can rescue this if need be after the bisque firing. S transfered with a light pencil imprint as a guide, then wax emulsion applied to outline the letter and the border to act as a resist from the pressed in organic matter and to create a negative space with the letter, hopefully! In theory > the organic matter is pressed imprinting the clay and will burn away in the firing resulting inverted spots and the letter S will be revealed by the smooth surface.

Below is a close up for a clearer view - Quinoa grain is used and burnished in with my Tigers Eye polished stone for securing and reassuring a definite imprint.


Monday, November 1, 2010

ALaW - NOPQ

NOPQ - Techniques...
N - Carving - negative
O - Resist - with shellac & red slip
P - Imprint - with a needle tool
Q - Underglaze - washed back

Saturday, October 30, 2010

ALaw techniques for NOPQ

I've just about got to the pointy end of the stick for the most common techniques, so now time to deviate and explore...
N - Carving negative
I used the carving technique with 'A' and created a positive, this time trying for a negative at the leatherhard stage I carved the clay inside the letter rather than on the outer.
O - Resist with shellac & red slip
With the letter 'I' shellac and sponged back into the clay with water created a raised 3 dimensional letter. Here with 'O' shellac is used to resist the red porcelain slip. Theorically what I am trying to achieve is, in the bisque firing the shellac will burn out resulting an O and border clean of slip.
P - dots
No guessing where this idea came from... getting to the pointy end of the techniques! Very simple really and I like the look.

Q - underglaze washed back

One would ask! Why apply black underglaze to wipe back with a wet sponge on a white bodied porcelain when wanting to create a pure white ground as the final result? I asked myself the same question half way through. Q - proven to be the most challenging one in this set of letters I won't know my verdict until the final firing...