Wednesday, July 28, 2010

ALaW - B

I've just released I've forgotten to post letter B...!

B - applied clay


Applied clay for surface decoration is used as a means of adding 3D textures, shapes and patterns in your design. Simple additions of pellets or coils are adhered to the surface from random patterns to specific designs, and is also used to enhance handles and spouts on functional wares. Good examples of these are found on Medieval English Pottery.


I've chosen to use the coil method...


Using an extruder for icing cakes, porcelain clay is extruded through to make a small coil. A fine 'B' imprinted into the clay tile, via tracing paper.

...starting to build the letter by using the extruded coil, placed over the imprint with a little water to secure and adhere.

Letter B starting to take shape, tools used; brush to apply water on imprint and pointed wooden tool to shape the clay and run along edges to seal.

Fine tuning... adding more coil on each end and in the centre and shaping. Carving the edge for the border with a carving tool, still at the leatherhard stage.

Finished off by leaving to dry then sanded with a fine sanding pad for a smooth surface (in the raw stage ready for bisque).

ALaW - C

Alaw 2010 alphabet challenge continues and we're into week three of the second alphabet, my weekly entry... doing catch-up last weeks letter C.
C - Impression

Probably one of the oldest methods to make a mark onto the clay surface and has been used throughout all ages and cultures. Anything can be used to make an impression from found objects of organic or man-made materials, coarse open-weaved 'textured' fabrics to complex hand-made carved stamps!
I'm opting for somewhere inbetween, by carving my letter into a plaster tile and making a stamp in clay, *Bisque firing it, to then, press into the 'soft to leatherhard' clay.


Transfering the letter C into the plaster tile (I prepared earlier) with a pencil & transfer paper, leaving an imprint into the plaster.

To make a plaster tile; a small mix of plaster is poured into an ice cream container, once set hard it's poped it out making for a nice neat smooth edged tile to carve into.

To make the carving easier I'm using my Dremel with it's U-beaut pointy tool, just right for the fine lines. I used to do all my carving painstakingly by hand with a carving blade, e'ons later....! Finding the dremel has made life sooooo much easier it carves into plaster like butter.

Making the clay stamp from the carving...
Once the carving is done in the plaster tile the plaster dust must be cleaned out or it'll effect the imprint of the clay stamp were going to make. A ball of clay is rolled and flattened with pressure over the carving and a handle is attached... for easy stamping later.

* Bisque firing the stamp - generally before undertaking (the transfering and carving in these few steps above.... ) shrinkage is considered, the size of the C is increased the same percentage as the clay body shrinkage because in all firings clay bodies shrink and with each temperature a different rate of shrinkage... still with me? But seeing I'm fast tracking and am reasonably skilled enough I've cheated a little and made the tile the same size as the photocopied image; making the stamp and drying it off a little in the kiln to harden just a little and then carefully stamped into the clay.

Final result, C sanded and ready for bisque firing.

Tuesday, July 27, 2010

Supplier of Farm Y'Art...

Recently I had a display of my farm yard pottery at the Qld Home Garden Expo, up until now it has been the only opportunity to present it for sale to the general public ... Just last week I have been fortunate to find an outlet for the complete range and it can now be purchased through Peregian Garden Centre.

Owners Paul & Susan Gillies have transformed the Garden Centre into a hum of activity and is looking just beautiful.

Open 7 days 9-5

2197 David Low Way, Peregian Beach, Ph: 5448 1680

Sunday, July 25, 2010

Kiln opening...

I still have the same excitement as I did on my first opening of the kiln some ten years ago... within this excitement I have this naughty little habit of looking into the kiln and taking something from it (kiln robbing) before it is cool enough to open. Luckily, this morning it was cool enough to open and didn't have to refrain myself from opening someone else's wares!

YAY! Happy faces all round as we unloaded the kiln.

Great results from the glazing workshop we had on Friday....

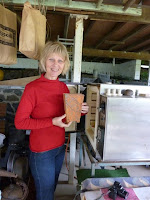
Unloading from the kiln...above; Lidwina with her piece and below James...

Pictures; close-ups and detail of the pieces....

Lidwina's Vessel; the stipple effect is evident and gives great variation to the glaze and overall finish of the piece...

...her carving of sharp lines are highlighted by the oxide applied underneath the glaze. Perfectly excuted Vessel, for her first attempt at clay and glazing, top marks...well done, Lidwina!

James' Urn; James has training in Ceramics and is evident with his even application of the glaze

...his understanding for the oxide wash underneath has worked really well on his carving and relief work; the face in the centre of the Urn. Great stuff, James!

For the Ceramic readers; notes from the workshop...

CHROME RED GLAZE
(Oxidation only)
Frit 4364 ………………….. 500gm

Lithium Carbonate…….. 350gm
Ball Clay…………………… 150gm
Chrome Oxide…………… 20gm Tin Oxide………………….. 15gm

A Matt Red/Orange dry glaze. Red fired at 750*, rusty Orange at 850*, and Green to Rust at 1060* - 1120*. Being a dry glaze no sieving is necessary.

METHOD OF APPLICATION:

OXIDES:
Oxides are used to create interesting effects with the glaze and clay body; in this instance we are using it to enhance the textures under our glaze. A wash of Manganese Dioxide under the glaze can be used to highlight carving and textures in clay, different thickness in application of oxide can increase the dimension in glazed finish, the wash is applied with a brush or sponge left to dry for a few minutes then wiped back with a damp sponge leaving the oxide in the carved areas in the clay. Wash consistency: 1 tblspn Manganese Dioxide to ½ cup of water.

The results after firing are the familiar Jet Black - Gun Metal colour I create in my Rusty Unearthed and Sculptural pieces.

GLAZING:
There are many methods of applying a glaze; spraying, dipping, pouring, brushing etc… In this case we will brush with a stipple method, this is a familiar term used in painting it’s a dabbing action rather than a brush stroke. The other methods mentioned above can be used except the spraying; lithium in the glaze will clog your spray gun and is not desirable.

The first coat is applied randomly over the oxide… at this stage it is not important to cover the whole surface, some areas left free of glaze will allow the oxide to show through adding to the overall effect of the finished piece. Two more coats are applied in the same manner; randomly. An important note with the 2nd & 3rd coat remember where you started so to get an even application, forgetting the starting point can make for an unsightly - blotchy patch once glazed.

FIRING:
In this case we will fire in an electric kiln (for an oxidized atmosphere) to 840* the desired look is for a bright Orange colour with a little tinge of red.

Saturday, July 24, 2010

Glazing workshop

Yesterday I had the pleasure of conducting a glazing workshop with a couple of friends.
Lidwina and James with their pottery pieces applying an oxide before glazing. The purpose of the oxide is to highlight the carvings in their designs under the final glaze.

James and his vase with Lidwina in the background both glazing with Chrome Red Glaze, a popular glaze from my Tafe days.

A brilliant dry orange colour...


an example

An Urn in Chrome Red Glaze I made in 2008

The kiln loaded and ready for firing. Seeing it's a small load I'm using my single phase, little pocket rocket!
Today I fired the kiln and tomorrow we will crack open and unload the finished pieces...

PLEASE NOTE: This is a non-functional glaze and should never
be used on functional tableware.

Tuesday, July 20, 2010

ALaW - Part Two 'A' and a change of medium...

The alphabet challenge ALaW 2010 continues and we now find ourselves into July and the second alphabet. I was going to use recycled teabags, but I have decided to explore my primary medium, clay.
Our task - to be experimental and explore different techniques...
I have chosen to use Porcelain clay, and will be using different methods and techniques to create each letter. Seeing that they are so small and my kiln much larger, I have decided to complete the whole alphabet.... then place them in a bisque, glaze, then fire to Stoneware. So each image initially will be at the raw stage until I start firing in the kiln.

Using a slabroller to make my 7 x 7cm tiles, firstly, I have to allow for shrinkage...each clay body has it's own shrinkage rate and at different temperatures. In this case I've allowed for 12% shrinkage. Fingers crossed the end result will come close to the desired size!
Great skill went into the design for cutting the tile, a round tin close to 7 x 7cm. Yep... that'll work, a flaten here and a flaten there, makes for a nice 7.84 x 7.84cm (must allow for shrinkage)square'ish shape...a test drive and it's a go'er!
Patience is a must in claywork especially in the winter months. Once the slab is rolled the tile can be cut...care must be taken as clay has a memory, if it is distorted at this stage and reflatened it will remember and distort back in the final firing. So it is left until the leatherhard stage (inbetween - wet & dry) before working on it.

A - Carving technique: light pencil drawn to transfer letter with tracing paper, with a carving tool cuts into leatherhard clay. Thought is applied to the angle of the cut to create a 3D effect. Carving at the leatherhard stage creates little beads of clay along the cuts these are left until the clay is dry enough to sand off to keep the edges sharp and precise.

Nature at its best!

This afternoon I was fortunate, no, blessed, to view the most beautiful sunset by Mother Nature and just wanted to share it with you...

Wednesday, July 14, 2010

Abbey Medieval Festival

Record crowds gathered for the Medieval Tournament to enjoy the medieval experience, some photos from over the weekend...
Glen & I

Girls from Packers Leather

Me & my good mate Graham

Friday, July 9, 2010

Abbey Medieval Festival 2010

Well only one more sleep to go to enjoy some good ole' medieval mayhem!!!
And what a grand ole' time I reckon will be had, seeing my set up is directly opposite the Stagg Inn and infront of the Village Green.

Refreshments and Entertainment to see me through the weekend, who could ask for more!

Thursday, July 8, 2010

Queensland Home Garden Expo 2010

The big weekend with the two major events I've been busy working toward has arrived; Home Garden Expo and the Abbey Medieval Festival. It's all started happening...today I set my Farm Y'Art display at the Home Garden Expo
Farm Y'Art! ...All made in clay, a taste of nostalgia that won't rust away.
...and come tomorrow I will be setting up my table display at the Abbey Medieval Festival.

Thursday, July 1, 2010

History of the Masterpiece...

Words by The Abbey Museum on the history of the Masterpiece for the Medieval Masterpiece Exhibition 2010...
"In the Middle Ages, a group of artisans engaged in the same occupation - cobblers, stonemasons, carpenters, etc. - would associate theselves for the protection and mutual aid. No one within a town could practise a craft without belonging to the appropriate guild association.

Members of the craft guild were divided into Master, Journeyman, and Apprentice. The master was a very accomplished craftsman who took on apprentices. Usually, these were boys in the teens who were provided food, clothing, shelter, and an education by the master, in return for unpaid work as an apprectice, often for a fixed term of service from about two to nine years.
My entry SECTION 7 - Aquamanile FIRST PRIZE - Master Artisan
After this, an apprentice became a journeyman, who was allowed to work for one or another master and was paid wages for his labour. Once a journeyman could provide proof of his technical and artistic skills, by showing his 'masterpiece', he might rise in the guild and become a master.

My entry SECTION 7 - Zoomorphic Jug SECOND PRIZE - Journeyman

From the second half of the thirteenth century onward, we hear, first in isolated instances and then with greater frequency toward the end of the Middle Ages, of a more clearly specified challenge: in order to demonstrate his skill, the candidate must excute a work for official examination, the materpiece.

From the present vantage point, a most striking feature of this Medieval institution of masterpiece-making was its wholly artisan purview. Masterpieces were excuted by goldsmiths and tapestry weavers, to whose handwork we would readily ascribe an 'artistic' quality or intention. But they were also expected of apothecaries, carpenters, rope makers, and other professions".

The Exhibition is being showcased at Bribie Island Community Arts Centre, Sunderland Dve, Bribie Island from 30th June to 9th July, 2010.

Medieval Masterpiece Exhibit opening

Last night saw the Official Opening of the Medieval Masterpiece Exhibition (30 - 9th July) at Bribie Island Community Arts Centre. The competition is in it's third year running and has gathered some of the finest Artisans and Craftsmanship in the Medieval Arts. Director of the Abbey Museum Michael Strong opened the occassion with a speech including his future vision of collecting some the finest winning pieces each year and showcasing them in a prestigeous International Touring Exhibit.
To his success, Michael has been the driving force behind The Abbey Medieval Festival. Some 21 years ago, an idea was conceived to host a Medieval Tournament to entertain the locals and a small band of folk gathered to put on a show. Today we see the Festival is listed in the top 10 Medieval Festivals worldwide, quiet an achievement! The event has grown stronger with each year and I have no doubt that once the word spreads of his unique Medieval Masterpiece Exhibition that Michael and his dedicated colleagues of The Abbey Museum will see his vision of a Medieval Masterpiece 'International Touring' Exhibition will become a reality.