Wednesday, February 27, 2013

Used tea bags wanted!

Always one to see the positives in things - this is one positive I love about social media.  A little over a week ago I made a call-out for used tea bags via emails and facebook.  Here's my message I sent out...

"I am on the war path to collecting more used tea bags.  My late dear mother Rosemary was the forerunner in collecting all the tea bags I used in my 2010 "Expressions Of Love" Exhibition, unfortunately she is no longer with us anymore to rally them up for me, so, I am extending my call outward...
 
I have a solo exhibition (yet to be named) at Noosa Regional Gallery in 2014 - the next installament on my "Expressions Of Love" art works - which was eight years in the making.  To my amazement thousands of tea bags went into the quilt alone, so I need to start collecting now!  As I only have under one year to produce another body of new work."

The response has been overwhelming with reply emails, messages on facebook and the like from folk all over the countryside even as far as Brissy willing to start collecting for me.    I even received a photograph with a message from Anneke "Sammie guarding the tea bags" pictured below. 

And,  Rosebed St Gallery Directors Maya & Annie have offered their gallery as a collection point to drop off all the dried tea bags* (many thanks ladies).   If your into a drop of tea and would like to join in, you are more than welcome!  My email address info@kimschoenberger.com if you would like me to come and collect them.

 
I shared this image on facebook the other day - my deadly treadly still rockin, it's sewn thousands of teabags, thousands more to come no doubt. It was given to me by my mother for my sweet 16th birthday.  

 
Here's Sammie soaking up the rays keeping an eye on the drying tea bags... Anneke's drying set-up here looks awesome...  oh yer while I'm on the subject many folk have asked me how to dry them, this is my method... 
Method for drying tea bags all intact; tea, string and labels. (any brand or flavour)
The best way to dry them is in the sun or in an airy warm position until dry - ie; on the window sil, outside verandah, concrete area or similar and on a plate to avoid staining (or better still on a piece of timber) and when completely dry stored in a paper bag or cardboard box. (Wet teabags stored in a plastic bag go mouldy and are rendered unusable)


Many thanks to everyone who have joined in so far, it is greatly appreciated!!!! Kindest regards...Kim

*Rosebed St Gallery
13 Rosebed St, Eudlo, 4554
Phone:07) 54573780
Wed- Sun, 10am - 4pm

Monday, February 11, 2013

Two Group Exhibitions - Two Galleries

It can be so exhilarating and inspiring exhibiting amongst other creatives, I never cease to be amazed by the talent of other artists, for me its so inspirational I end up going into creative overload and over drive and being a live-wire for days...!  Its almost like I should go and get therapy for it.  

Two fab galleries; Studio 4 Gallery, Marcoola and Rosebed St Gallery, Eudlo (which I might add.... are two local professional galleries that nurture, support and provide us with a venue to showcase our art works and reach a wider audience) are both currently showcasing a group exhibition, that feature my ceramic assemblages, so if your in the area...

 
 'Childhood Companions' Max & Maxine - (more images on my website Small Is The New Big) at Studio 4 Gallery and exhibiting until 24th Feb, 2013.
 
 
 ...and my metal and porcelain Flourish III (more images on my website: Roses Of Rosebed) at Rosebed St Gallery and exhibiting until 3rd March, 2013.

Exhibition specs:
Studio 4 Gallery, Marcoola
Small Is The New Big
Until 24th February, 2013

Rosebed St Gallery, Eudlo
Roses of Rosebed
Until 3rd March, 2013

Tuesday, February 5, 2013

crating artworks for tour

The last couple of weeks its all been about getting my art works together for Artslink Queensland 2013-14 Touring Exhibition Teasing The Domestic. (details in a previous post ) Special crating care is specified for art works to tour - museum quality crating, as the works will travel for two possibly three years so the art work really needs to be packed into strong firm boxes.  We were recommended  to use Rebul, I can highly recommend them too, if your ever in need of quality crating. Packaging can seem a little tedious at times but using this new crating system, I found it quiet an interesting process so much so I documented it to share it with you!

They come as flat pack.

 
Assembling was a breeze, each section slot into each other with pvc pipe, run along the hard cardboard tubular tracks, I also chose the option of internal foam lining.  The outer shell is covered with a thin sheet of MDF board with carry handles.

 
I considered several options for securing the artworks inside the crate, as it goes I had a chunk of foam left over from packaging another artwork and if fit snug as a bug, how awesome was that!!  I also bought another slab of foam to go on top, it ended up being the right internal height, even without prior measuring - the gods were on my side this time :-)
 
I opted to carve into the foam so the art works fit snug into the hole, first by outlining each art work and carving into the foam using an electric carving knife (images below), I learnt this trick from the foam supplies, the knife cuts into the foam like butter and a cool neat cut too, I wish I knew about this trick years ago!!!


I discovered too that cutting smaller lengths made it easier to pull out evenly - below:

 
My Domestic Duties Chp.2 art works with their fragile little movable bits; arms, legs and bases all safe and snug in the foam - atleast I can rest easy they will all travel safely inside the crates whilst in transit.


To date; Teasing The Domestic is booked for 2013 and fast filling for 2014.

Thursday, January 24, 2013

featured in hardcopy!

Some of you already have heard of my latest news, its taken me a few weeks to digest and contain my excitement!  As I've mentioned in an earlier post, last years hard work is starting to pay off.  Featured this time is the Quilt from my Expressions Of Love Exhibition in a sumptuously delicious hardcopy entitled TEXTILES: The Art of Mankind by Mary Schoeser and published by Thames and Hudson

Mary Schoeser, a leading authority in the field of textiles and Honorary President of the UK Textile Society and was commissioned by Thames and Hudson to compile this stunning book - It's 568 pages thick and has over 1000 historical and contemporary images...

 
Below is my image and features on page 60, and a paragraph on page 26 talks about my piece - I am just beside myself to be included - this one, of course is in honour of my mother, her memory lives on and now in hardcopy and soon the Quilt among other artworks from Expressions Of Love will travel in a touring exhibition across Queensland.  (More details in my next post!)

 
In loving memory of my spirited mother, Rosemary Bourke.

Saturday, January 19, 2013

500 Teapots

Breaking news!  TEA BRAKE pictured has been selected and will feature in the next publication '500 Teapots Vol.2' by Larks Books (among many other fantastic artists teapots, I might add).

Larks Crafts, 500 Series started with the first volume of 500 Teapots in 2002 since then 35 books have been released.  Other titles in the 500 series include; 500 Art Quilts, 500 Vases, 500 Ceramic Sculptures, 500 Cabinets, 500 Raku, and the list goes on.... and 500 Pitchers (2006) in which I was fortunate enough to be included with another of my images. 

This next edition 500 Teapots Volume 2 will be released this coming August 2013.


Photography by Natalija Brunovs

Sunday, January 13, 2013

more metal in the garden

After making the butterfly sculpture from cutting down the sheetmetal the left over random bits reminded me of plant foliage so I decided to make Glen a couple more bits for the garden.  I am not one to discard metal scraps when they can be useful for sculpture fodder!!

No need for altering this piece of steel (well apart from the curly bits on the end), its already taking on the shape of a Heliconia frond.

 
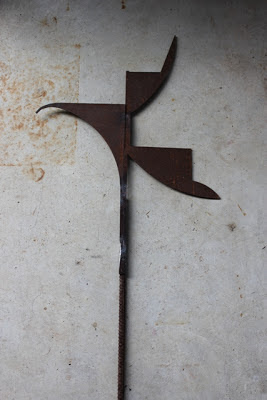
This piece reminded me of a Strelitzia flower, two separate shapes were welded together and welded onto a length of reo. 
 
 
And an obvious one - a daisy type flower, comprised of three parts welded together.
 
 
I welded each piece onto a length of reo, I was contemplating a wall triptych with them however I decided to go the 3D version to accommodate the butterfly sculpture.
 
 
Glen finds a home for them in the garden - you do have to be looking to see them, though once the contrasting and surrounding foliage grows on they'll be more visible. 


Sunday, December 30, 2012

A New Year ahead...

"As the New Year flows in may you soar ever high, reach greater heights and find happiness in everything you do" 

 
- Unknown (& photographer unknown)
 

HAPPY NEW YEAR FOLKS!

Lets hope 2013 brings the best of everything, for everyone everywhere...
 

Saturday, December 22, 2012

Christmascheers!

"May the good times and the treasures of the present

become the golden memories of tomorrow. 

Wishing you all the love, joy and happiness for Christmas"

 
- Unknown.

 
I came across these groovy corrogated iron Christmas Trees on my travels, I just had to photograph them - you will have to excuse the tardy quality - I was behind the drivers wheel hanging out of the car window to take the photo.... and yes, I was stationary at the time!
 
Christmascheers,
Kim


Monday, December 10, 2012

Metal scraps turn into butterflies

Yesterday as I was stacking and sorting through some new metal scraps (thanks Steve) and to make room for the steel I decided to cut up a large sheet of thin skeletonised waterjet cut sheetmetal that was kinda in the way.  I had been studying the sheet for some days on 'what' I could potentialy do with it and I was already in mind of cutting it down, there was way to much metal (negative space) cut from the piece, not really leaving much in the way of usefulness as a whole or strength for that matter. So out came the grinder!

I was laying out the off cuts bits onto the concrete when Glen walked passed and uttered 'butterfiles'.  I had to look twice.  Of course, in my mind I was seeing abstract shapes being more symbolic in nature, of course Glen was seeing through his eyes being gardening and nature, and his love for all things 'green'. Upon another look I could see clearly - Butterflies, that they were!!

The passing comment triggered an idea for a sculpture, somewhat a little off the beaten track from what I would normally make however knowing he would really love it, I decided to 'whip' it up!  ...and what a great Christmas gift to boot!

The 'cut off' shape - clearly in a photograph look like a butterfly.

 
Bent and shaped alittle, with small Reo discards for the body.
 
 
I went looking for some extra long lengths of reo to stake into the ground and found this reo re-inforcing stuff Glen uses for work - I'm sure he won't miss it if I pinch a bit :-) 

 
After welding the bodies and the wings together I welded them randomly into place on the reo frame - in situ positioned in the garden (a sadden dry garden I might add - we are so desparately awaiting some rain for our poor de-foliated plants!!!)


And of course Glen was tickled pink and loves it!!
 

Thursday, November 29, 2012

new assemblages exhibiting

Last Friday night saw the official opening of Small Works/Small Town Exhibition at Rosebed St Gallery, in the quaint little township of Eudlo.  Recently featuring on the television show Better Homes & Gardens only a few months ago, the gallery is a hive of activity and oozing with funk!  Always a wonderfully curated show, the girls Annie Burns and Maya Carter-Malins really know how to deliver and never fail to showcase an amazing array of artworks.

Small Works/ Small Town is Rosebed St Gallery's annual summer showcase - a 'takeaway art' exhibition - its a great format where buyers can take the artwork with them instantly upon their purchase, practical and a great idea for the seasoned visitor!

I just happened to have some new small assemblages coming through in the studio and submitted an EOI and was selected to exhibit, among many other talented artists. A few images on show, (to save me time...all the finer details are all on my website :-)

 Soul Connection II
 
Trinity I - Sold

Trinity II

Trintiy III
 
 
...and good buddy Jo Murray has posted images from the opening night in her Picasa Web Album and on her blog if your wanting to see what fun was had!

The Small Works/ Small Town Exhibition continues until Sunday 23rd December, 2012.  Rosebed St Gallery, Eudlo. Hours: Wed-Sun 10am-4pm

Wednesday, November 21, 2012

No.11 sculpture - In situ

Installation day for the commission, it was really nice to see the piece in place and how I envisioned it....


Saturday, November 17, 2012

Domestic Duties Chp.2 & Expressions Of Love - on tour

Upon reflection, this has been a big year and an exciting one for me with the development of my art career.  My focus this year has all been about 'honing in' on what and where I want to see myself and my art heading.   Bit by bit, chipping away and working hard - entering competitions, exhibiting, making art/installations, gallery proposals, upgrading my website etc., etc., while remaining focused and positive (even in the times of continual knock back and almost reaching the point of literally wanting to drop my bundle...!), I am now starting to see the light at the end of the tunnel and all my hardwork is starting to pay off with an array of successful outcomes coming to fruition and opportunities ahead of me.

One of my positive outcomes is that I was shortlisted and selected for Artslink Queensland 2013-14 Touring Exhibition Program.  A selection of my artworks from my most recent solo exhibition Domestic Duties Chp.2 and my Expressions Of Love will feature in a group exhibition (curated by Artslink Qld) entitled Teasing The Domestic alongside two other Queensland artists Corrie Wright and Kellie McEwan and the World Tea Cosy Competition, co-ordinated by Miles Regional Arts Council.

The layout image below showcases some of the artworks, which appears in the 2013-14 Catalogue.

 
A couple of images of the artworks selected from my Domestic Duties Chp.2 solo exhibition:
(more images and details can be seen on my website :-)

 
Constant Appetite Bottomless Pit

 
Group assemblage from left;
 
This Chook Is Totally Cooked, Dance To The Beat I + II, Betty Bloomers and Up The Duff.
 
 
SATIDSFYING + FULFILLING
 
...and from my Expressions Of Love solo exhibition:


Quilt - detail

 
Nancy's Challenge - detail

 
Doily - detail


Sunday, November 11, 2012

steel structures around home

Lately, I've been able to beautify around the home a little with some steel sheeting 'discards' (and other random shapes of steel) thanks to my new mate Steve at Caloundra Waterjet Cutting.  The steel sheeting used and cut for jobs are skeletonised leaving behind the negative space from 'what' has been cut - each sheet can vary with random and sometimes repetitive shapes, which oozes sculptural fodder!!!  Not only do they look great, it has been an interesting experiement - I was able to get the one up around the water tank before the Open Studios program and as a result received some awesome feedback.  I can see this experiement has alot of potential!

A detail showing the different shapes welded to the steel sheet.

 
Two sheets were placed until I liked the results, then welded together from behind and bolted to hardwood planks - each sheet is around 6mm thick.
 
 
Then this sheet of steel (below) is a whopper, 12mm thick and super heavy! This was a recent collection, I really love the random nature of each cut, even though Steve is probably working at getting the most out of the steel.  This piece slot exactly into place and I felt didn't need anymore added to it (for now anyhows) and looks rad near the other sculptures.
 

Wednesday, November 7, 2012

commission progress - clay component

Shaping up nicely!  The clay component is labour intensive - there are so steps involved in the process, the making, the drying time, sanding each piece, bisque firing, several steps to glazing, the glaze firing etc... and then making sure you get the shrinkage rate right!!!  Thankfully after the final firing, the reward comes when opening the kiln door and seeing all is well.

In between blog posts and living with the steel structure for a bit, I've decided on some minor adjustments to the clay design - instead of making each alternate block smaller I've decided to make them all uniform and with less texture on the surface giving each block a flatter finish which sits better in the steel frame.  And slightly reducing the firing (reducing oxygen in the kiln whilst firing) to yield a richer patina in the glaze, aesthetically pleasing with the rusting steel.

A sneak peak - the clay behind the negative space looks good.


Clay process took two months in the making - various depths of clay blocks were made (estimated according to the clay's shrinkage rate). Here the kiln is all loaded and ready for bisque firing.


After the bisque, the clay blocks ready for glazing.


Glazed blocks drying and ready for loading into the kiln for the glaze firing. I've made more blocks than needed - experience has taught always have extra on hand just in case!


The anticipation of cracking open the kiln the next day..........!!!!


Assembling - a day or two of fine tuning. Detail blocks stacked within the steel frame and the clay's surface.