Tuesday, January 18, 2011

Exhibition gets a mention...

It's just been brought to my attention, my current exhibit at Studio 4 Gallery 'Deconstruction : Reconstruction ...a journey of intensity' is noted in the on-line Australian Art Collector's - What's On segment with the image of my assemble piece 'House of the Holy : Enlightened Ones', (which I suspect would be a delight for the new owners of the piece).

'House of the Holy : Enlightened Ones' - Clay and Steel

Monday, January 10, 2011

Delivery day...

Works - photographed, packaged and ready to deliver to Abbey Museum tomorrow. Just in the nick of time really, as of Monday 17 Jan through to Saturday 22nd the Abbey Musuem is hosting an Egyptian Family Fun Week - full of fun activities; building Pyramids, digging for Artifacts, Mummifications, Heiroglyphics the list goes on...
Ofcourse, these pieces are for the 'digging for artifacts'
Here (above L>R) a group of wares; Jar with a lid, four Beakers with Heiroglyphics. The larger two Beakers contain Cartouche (royal names) of Ramses II.
Cartouche 1 - (royal names) of Ramses II - 1279 to 1213 BC

Four plates; (two above & two below) designs taken from the Egyptian period.
The plate above right is known as the 'Fish Bowl' - New Kingdom, Dynasty 18, about 1450 B.C (ofcourse this one is a reproduction for the dig!), the original piece is housed in the Egyptian Museum, Berlin.

Saturday, January 1, 2011

ALaW 2010 - Alphabet two

I had two spare tiles left over, spares for 'just incase'. When working with clay it pays to make more than is needed, incase you make a mistake, drop or break one unintentionally. I must say it is not an easy task to reproduce another identical tile, the same thickness several months later.
A bit of fun, not sure if I'll use them or not.... could be useful for the final layout.

One more photo to share with you. I particularly like the result of staining the clay made on the plyboard I had them stored on, six months of aging...


ALaW - XYZ

XYZ Techniques....

X - Inlay - with red porcelain slip
Y - Freehand marking - with red porcelain slip inlay
Z - Carving
The image is a tad small to see the detail, you can enlarge it by clicking on the image.

AlaW techniques for XYZ

It was like fast and furious to get all these letters finished today and posted! Seeing the third alphabet for ALaW 2011 starts this Monday. So, simple and sweet to wrap things up.
I chose to use my most favourite piece in this alphabet to finish the last two letters using that technique with clay inlay. It happens to be 'P' -dots created by the pointy end of a stick, well, a pencil really.
X - Inlay with red porcelain slip
Transfered the letter lightly onto the clay tile using the transfer paper, then X marks the spot, dots with the pencil. Filled with red porcelain slip, left to dry a little....

...and once touch dry - fast tracking here (it is usually left to dry then sanded) I've used a turning tool to scrap back the slip to reveal the red porcelain slip clay inlay. I will sand when dry to sharpen up the final result.

Y - Freehand marking with red porcelain slip inlay
All my letters to date have been previously marked onto the clay via transfering paper, this time I've loosened up and drawn the letter Y and border freehand with a pencil deeply imprinting the clay tile. The dots are undertaken the same method as with X; clay slip inlay.

All cleaned up looking like a pink polka dot dress! Although once fired the slip will turn red.

Last but not least Z.... I decided to end my alphabet using the same technique that I started the alphabet with, (with the letter 'A') by method of Carving.

Z - Carving

YAY! All done, now all I have to do is -bisque fire them - glaze them - and fire them to 1300*
Stay posted to see the final result....

ALaW - UVW

UVW Techniques...

U - Woodcut Print - with black underglaze
V - Negative Print - with red porcelain slip
W - Negative carving - with black underglaze (Reverse to V)

ALaW techniques for UVW

My last letters for ALaW 2010, somewhat overdue! 5 weeks to be exact, but who's counting...
U - Woodcut Print with underglaze
I've been at this one to conquer for sometime now, with each attempt amounting to dissapointment. And you could say that it was U that held up progress (plus xmas, new year etc...) to completing my ALaW in time. Not wanting it to get the better of me, I left it until I had optimine time to devote 100% head space to retry.
My adjustments I needed to re-address were (and many);
  • The initial carving needed to be deeper, so off to buy real (sharp) woodcut tools!
  • Always remember to carve your letter backwards, just as well the first attempt was a fizzer (and on a test tile).
  • Re-adjust the thinking to clay and not paper as in the workshop, of course Kim...this should have been your first thought, huh.
  • Using black underglaze (not ink) resulted in different tackiness, well no tackiness at all actually. Hence the printing ink roller was not suitable, out with the sponge roller, a test run, and wolla, yay, as easy as that!

The techniques for the next two letters are taken from this idea of the woodcut print process, minus or adding some steps to suit the clay.

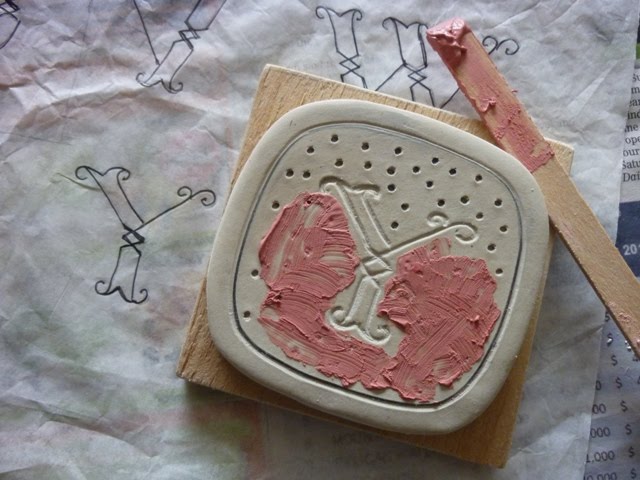
V - Negative Print with red porcelain slip

Instead of carving into wood I've carved deeply and directly into the clay with a carving tool. Then with a sponge roller loaded with red porcleain slip, I've rolled over the clay tile to print a negative letter V. Being careful not to get any slip into the carved letter, as in the ink printing method.

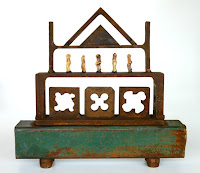
W - Negative carving with black underglaze

Reverse to V - Instead of carving the letter first I carved it last. Using the sponge roller again, this time loaded with black underglaze I've rolled over the whole tile completely covering it with black. When touch dry I've transfered the letter W into the clay tile (gently) to make an imprint, then carved the letter and border.